
Liquify are official Shopify Experts & Partners since 2014. If you follow a link to Shopify from our website and make a subsequent purchase this may result in a commission at no extra cost to you. Our opinions remain our own.
At Liquify, our Shopify Experts have been managing migrations from Magento to Shopify for over a decade and our typical client is a multimillion £/$ brand looking for more stability in their software and hosting.
Magento used to be a popular choice for starting an eCommerce store, but we’ve seen how quickly businesses grow out of it and struggle with its many limitations. It’s a fairly complex platform with limited support and a lot of manual updates (which increases the risk of impacting your sales if something goes wrong) and no one with any business sense wants to use it anymore. Self hosting successful ecommerce stores needs a team in-house. If you don’t have a development team in house you would be silly to use Magento.
But whatever the reason for moving to Shopify, you should ensure you are handling your Shopify to Magento migration correctly.
We’ve seen one business almost go bust after a mismanaged migration where their organic traffic tanked. Luckily, we helped them solve the SEO issues they created, but it was a costly and stressful 6 months. There are several steps that should be taken to ensure you are managing your migration to Shopify properly, and ideally, you’d be doing this with the help of a seasoned team of Shopify experts and Shopify Plus Experts.
But for those who don’t have the budget or just prefer to self-manage, our Shopify migration specialists have laid out a detailed description of the entire process and steps you should take when moving from Magento to Shopify.
Magento to Shopify Migration Checklist
Depending on the size of the store you’re looking at around 1-3 months for migration, with an additional month for monitoring SEO positioning.
- Understand the risks of a migration
- Create a development store
- Migrate your products and collections
- Dealing with Categories/Collections
- Ensure products and categories are all redirected correctly with 301 redirects
- Migrate your pages
- Ensure pages are all redirected correctly with 301 redirects
- Migrate your blog content
- Ensure blog posts are all redirected correctly with 301 redirects
- Spot test from Google Search Console
- Full URL test from XML sitemap or Search Console
- Create store look and feel
- Migrate your customers (at the very end)
- Going live and ensuring your old site is available on a subdomain
- Monitoring after a migration
1. Understand the risks of a migration
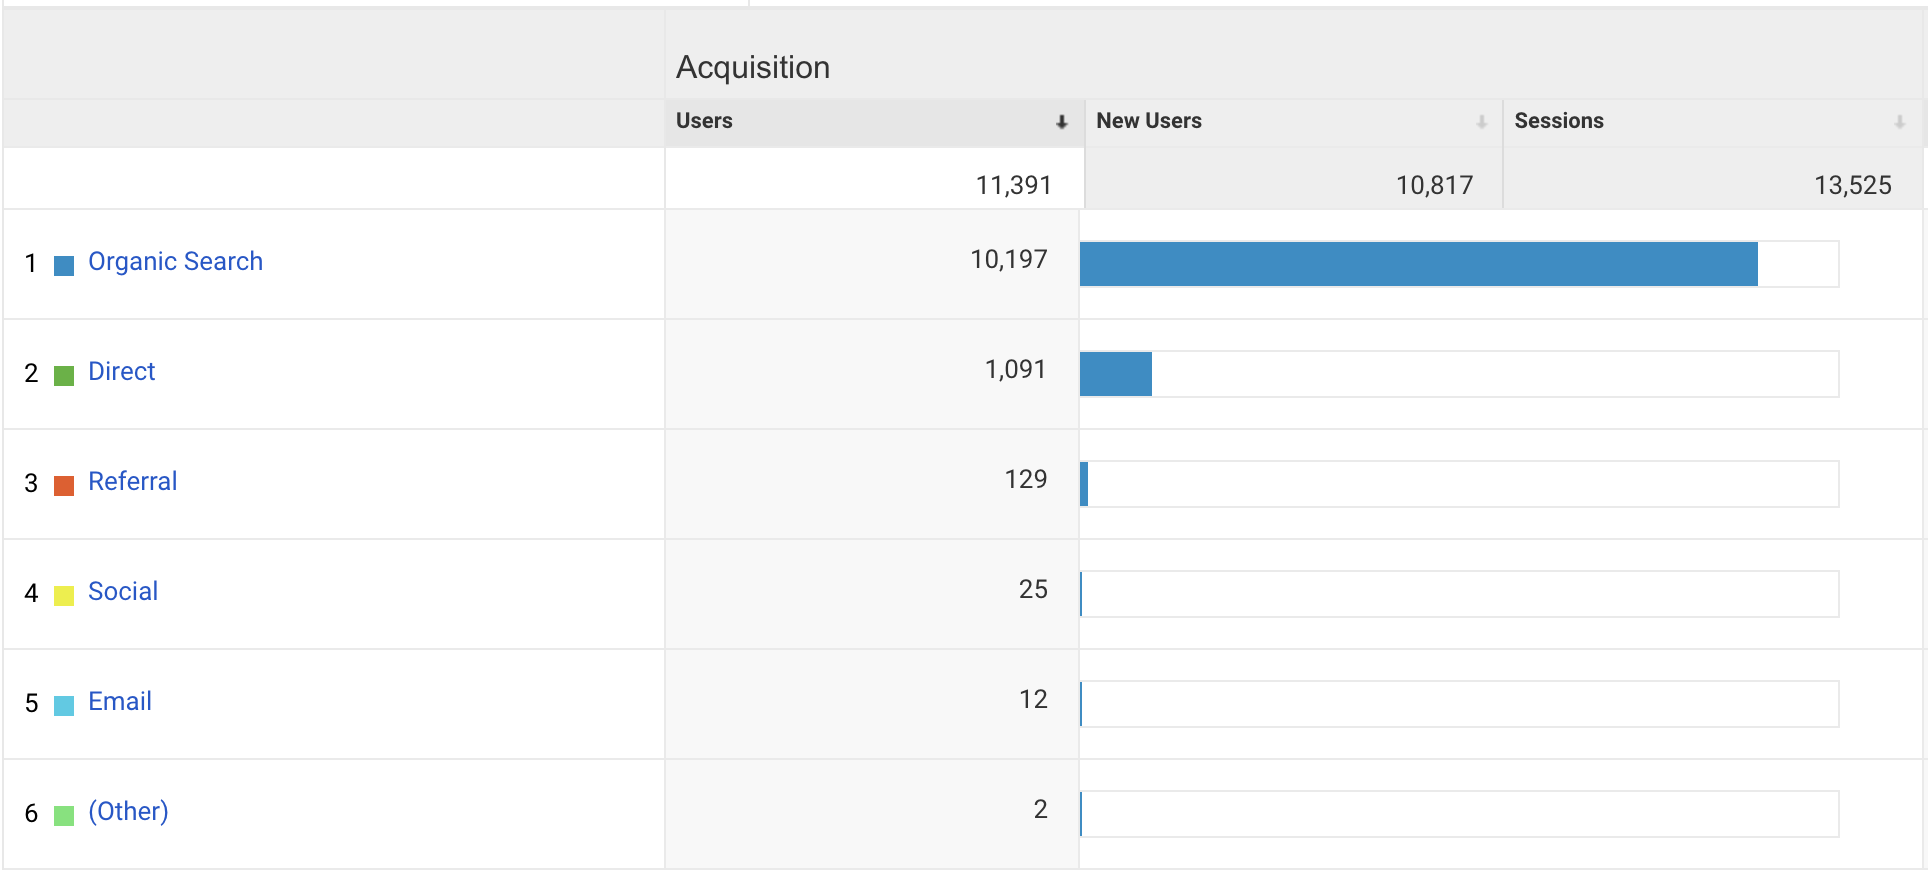
There are always inherent risks in a migration between any platform, and the main risk here is the loss of Google SEO position. Google search traffic is often a main asset for an established site which usually has anywhere from 30% – 70% of their customers coming from Google unpaid (organic) search.
 When you don’t migrate from Magento to Shopify properly and you lose ranking, you’re essentially risking the loss of sales from unpaid search results (which has a greater ROI (return of investment) than other marketing efforts since it hasn’t cost you anything to gain the sale.)
Instead, you need to redirect all the traffic and potential customers to your new site, making the transition as seamless as possible, without taking a hit on your SEO or Google ranking.
Making sure you follow each step in our Magento to Shopify migration checklist is essential, but if you are unsure about what you are doing, we strongly advise you to contact us, so we can help you manage your migration correctly.
Note: It’s much more costly in time (and money) to fix a bad migration, and sometimes the damage is beyond repair. So ensure you pay attention and do this correctly.
Key points of SEO to remember:
- Keep your content on the new Shopify website as close as possible to the old content on Magento.
- Redirect everything with a 301 redirect
- Test everything
- Double check that everything is redirected
- Triple check that everything is redirected
2. Create a development store and install required apps
When you’re ready to start with the migration, your first step is to create a development store. For this, we recommend that you sign up for a free 14-day Shopify trial.
When you finish setting everything up and you have created the development store, you will want to install the Excelify app. This will help you with some of the heavy lifting of a migration from Magento to Shopify.
We always use this app for Magento to Shopify product migration, as it allows us to export and import data between platforms much more easily.
3. Migrate your products and collections/categories
In this next step, we will use the app Excelify to export your products from Magento and import them to Shopify.
Here is a short guide on how on how it works to migrate products from Magento to Shopify:
- Log in to Magento and export products by using the standard Magento CSV export option in the admin panel under System → Import/Export → Export.
- Rename the file so that it contains words “Magento” and “Products.” For example: Magento_products_20201201_12345.csv
- Upload the file into the Excelify app. It should be recognised automatically based on the file name.
- Enter your Magento store main domain name; for example, https://mystorename.com. This will start the migration of images from Magento store to Shopify.
- Optional: Select Dry Run under Options in Excelify to test if everything works properly and make necessary changes if needed. Finish by pressing the Import button
- Download the generated Import Results file and check if everything looks okay. You will have 3 sheets in the file called Products, Smart Collections, and Redirects.
- When you have checked everything in the file and prepared it for import, upload it again to Excelify.
- All your Magento products should be in Shopify Smart Collections.
Note: Not all categories will be automatically transferred, and not all products will be created exactly as they are in Magento. A lot will depend on the complexity of the products, and you may need the help of a Shopify Developer. We recommend that you run a test import first with just a few products and make sure you keep regular backups of all your exported products!
4. Ensure products are all redirected correctly with 301 redirects
Excelify will, by default, add redirects for all products. This means that all old URLs will be redirected to new URLs. You should spot test these to ensure they are all done and that old URLs will map to the new ones.
Top Tip: Pay attention to product URLs that have special symbols in their names, as they sometimes don’t copy over correctly.
All URLs will need to be changed when you migrate products from Magento to Shopify. When you compare Shopify to Magento, you will notice that Shopify has a fixed URL structure that is different from Magento’s. All old URL’s need redirecting to the new URL structure on Shopify.
5. Dealing with categories/collections and migration
Excelify will also create your collections in Shopify based on the categories you have in Magento. While this will help you immensely with the migration, keep in mind that the app will NOT do the following:
- Redirect category URLs (on Magento) to new collection URL on Shopify
- Migrate category text/images /meta title/meta descriptions.
You will need to do this manually and carefully. You can copy and paste content and add redirects manually within Shopify’s admin page or you can use a CSV export/import if there are hundreds of categories that need to be updated.
The Excelify app will create the category and ensure the right products display, but that is all it will do – the content and redirects will still need to be managed manually.
Pay special attention when redirecting categories, as those are often the highest-ranking pages for SEO!
6. Ensure products and categories are all redirected correctly with 301 redirects
When you are finished with all of the previous steps, we strongly advise that you do a spot test on your category URLs and product URLs. Make sure they work and that the users are redirected to the correct place on the new site.
Top Tip: Have a second person do the spot tests, we find it’s much easier to spot errors this way. We usually spot test from Google search console on high value pages.
7. Migrate your pages
Unfortunately, you cannot use Excelify for this step, so the pages will need to be created manually in Shopify and content copied over from Magento. When you create the pages in Shopify, copy the content over, including meta titles/meta descriptions, and all the pages will need to be redirected by using 301 redirects as well.
For example, if the page on Magento was on www.mystorename.com/contact you will need to add a redirect to www.mystorename.com/pages/contact, which is the new URL on Shopify.
Note: If you fail to add the redirects, you will lose any SEO value the pages had on the old site and customers may also follow links to them.
7. Ensure pages are all redirected correctly with 301 redirects
Again, always do a spot test after each step to ensure all the pages you moved and copied over are properly redirected to the new pages/path on Shopify before you move on. It sounds boring, but it’ll help you know exactly what has gone wrong if you confirm every step is working before you move on!
If you’re unsure how to properly redirect pages, drop us a message and ask for our professional Magento to Shopify migration service. We aren’t cheap, but we are highly experienced in doing this. We have helped multiple websites with migrations including over 10 multi million $ sites and one listed company. We know what we are doing.
8. Migrate your blog content
You can also migrate blog content with the help of the Excelify app by importing it from Magento (or this also works for WordPress if that’s where your blog is hosted) using a similar process as you did to migrate products from Magento to Shopify.
You will first need to export your blog content from Magento and manually format that file into CSV format so it can be imported into Excelify.
Note: For larger websites be aware that excel has a cell character limit of around 32,000 characters which may not contain a whole blog post and throw an error. You can find a workaround as well as detailed instructions if you get stuck in their documentation here:
https://excelify.io/documentation/blog-posts/
When you are done with the import/export, you will need to manually handle redirects for all
blog posts so that the old URLs map exactly to the new ones under Shopify’s URL structure.
Top Tip: Pay special attention to old blogs with lots of content. There is often a substantial amount of SEO value in old quality blog content, and you should make sure everything is redirected carefully.
9. Ensure blog posts are all redirected correctly with 301 redirects
Spot test your posts and blog content to ensure everything is redirected to the new path on Shopify. Look for any errors that indicate the process was not done properly and do these redirects again (then re-spot check!)
10. Spot test from Google Search Console
When you are done and you’ve checked that everything is working properly, you should complete a spot test from Google Search Console to double-check everything from a search engine standpoint.
To do this:
- Pick the top 10 pages in terms of traffic
- Copy the respective URL and paste each one onto the end of the myshopify domain.
You want to see the “user redirected” to the matching content on Shopify. If they haven’t been redirected, then you have done something wrong and you need to go back to see what the issues are step by step.
If you’re struggling to figure out what’s not working, get in touch and we can help you with moving from Magento to Shopify.
11. Full URL test from XML sitemap or Search Console
After a successful spot test from the previous step, you can move on to do a full test of all your URLs. We do this by one of the following processes:
- Download all Magento URLs from either Magento or Google Search Console
- Put the URLs into a Google Sheet
- Take the password off the Shopify store
- Create a new column for new Shopify URLs with the myshopify URL (you’ll need to use a concatenate function for this)
Once you have a Google Sheet with all URLs mapped to the myshopify domain, you can run a script to test the page status code. There are multiple scripts available to check status codes & we also have a bespoke one coded.
When you run a script, it will show status codes for pages on the temporary Shopify URL. If everything is done properly, they should all read “code 200.”
If you don’t get the code 200, then you have done something wrong and you have probably missed some content or redirects. Often, you’ll need a Shopify developer for this step.
12. Create store look and feel and setup in admin
Next, you should focus on the aesthetics of your store (the look and feel). Along with the design, ensure everything is working as expected on the front- and backend in terms of functionality as well as user experience.
Most people tend to hire a decent Shopify designer/developer for this step and a seasoned Shopify expert will be able to help guide you on what needs doing next, making the whole process much faster and easier. A complete checklist here would most likely take several hours to create and and depend on your specific set up, as each store has its own circumstances you need to take into consideration during development.
13. Migrate your customers and orders (at the very end)
When you reach this point, you should be pretty much done and almost ready to go live with your new Shopify store. All of your content should already be migrated and the backend set up.
Migrating your customers and orders is an optional step, but it can make things easier and more streamlined in the long-run if you do decide to do it, particularly if you have a lot of recurring customers.
If you do decide to go ahead with user and order migration, Excelify has excellent instructions on this here and here.
(You can also try and use the cart2cart Magento to Shopify migration service for this step, but we use and recommend Excelify.)
Note: Your customer passwords will not be migrated and customers will need to create a new password, so make sure you notify them. This step should be left for the very end, just before going live.
14. Going live and ensuring your old Magento site is available on a subdomain
Once you’re ready to go live, you want to ensure that your old admin is still accessible on a subdomain. Contact your Magento host for this step, as they should be able to do it for you. It’s very important that the whole Magento site has the no-index tag, as you absolutely want to avoid duplicate content issues.
There are two key factors for this step:
- Keep the old website available for admin purposes and for any issues you may find around orders that were made during the migration process.
- Changing your DNS to point to Shopify should be completed on the day of the transfer. Typically, you would first want to change DNS so the new site is live and then get the old store available on a subdomain after.
By approaching things this way, you should minimise downtime. Just make sure to check beforehand if your host is available to do this on the day of your change over to Shopify. Also, there will be a period where customers may see the old site or the new site. During this period, you may need to modify your host’s file locally to access the old site admin.
Note: Expect to have around 10 minutes downtime whilst SSL is issued. If you have a very busy store, you should aim to do this part of the process during a quiet time, when there is usually less traffic.
15. Monitoring after a migration
After you have completed your migration and your Shopify site is live, you want to do the following:
- Ensure everything is set up and running correctly.
- Make sure your old domain is on a subdomain and set as ‘no-index’.
- Re-submit sitemaps to Google.
- Monitor Google positions for 2 to 6 weeks.
- Google analytics should be monitored for 404 URLs to ensure no redirects were missed. Any 404 paths should be redirected to relevant content.
- After some time, the old subdomain can be wound down and archived.
Conclusion
Moving from Magento to Shopify isn’t a simple process and there are a lot of things that can go wrong. Which is why the best option is to have this process managed by a seasoned Shopify Expert / Shopify Plus Expert.
By doing it yourself, you risk missing redirects, and losing valuable SEO and Google rankings, all of which you had to work hard to get. If you do decide to do the migration yourself, ensure you fully understand all these steps and don’t skip anything.
We have migrated dozens of stores here at Liquify and are proud to say nobody’s SEO has suffered.
So if you need help, drop us a line.