Liquify are official Shopify Experts & Partners since 2014. If you follow a link to Shopify from our website and make a subsequent purchase this may result in a commission at no extra cost to you. Our opinions remain our own.
Ok so in this short guide I’m going to explain how to connect GA4 to your Shopify store.
But before we begin you should go to your online store > preferences > and check under Google Analytics to see if Shopify are now supporting GA4 natively.
They (Shopify) are a bit slow to move on this one and as of writing GA4 is not natively supported yet but we do expect this to change soon. The deadline for depreciation of GA3 is a year off minimum but even so you’ll likely want to start gathering data in GA4 even though you don’t yet fully use it (e.g. for making YOY comparisons etc). We do not use GA4 much yet but we have implemented on dozens of Shopify Plus and regular Shopify sites (some limitations on events apply here). in this guide i’ll show you how to connect GA4 to your Shopify store.
Most smart people right now are using GA3 and GA4 on their Shopify store. If this is what you want to do continue reading.
Do note that unless you’re using Shopify Plus you will be limited to what you can collect with GA4 currently.
Step 1 – Create a GA4 property.
To connect a GA4 property to your Shopify store it already needs to exist.
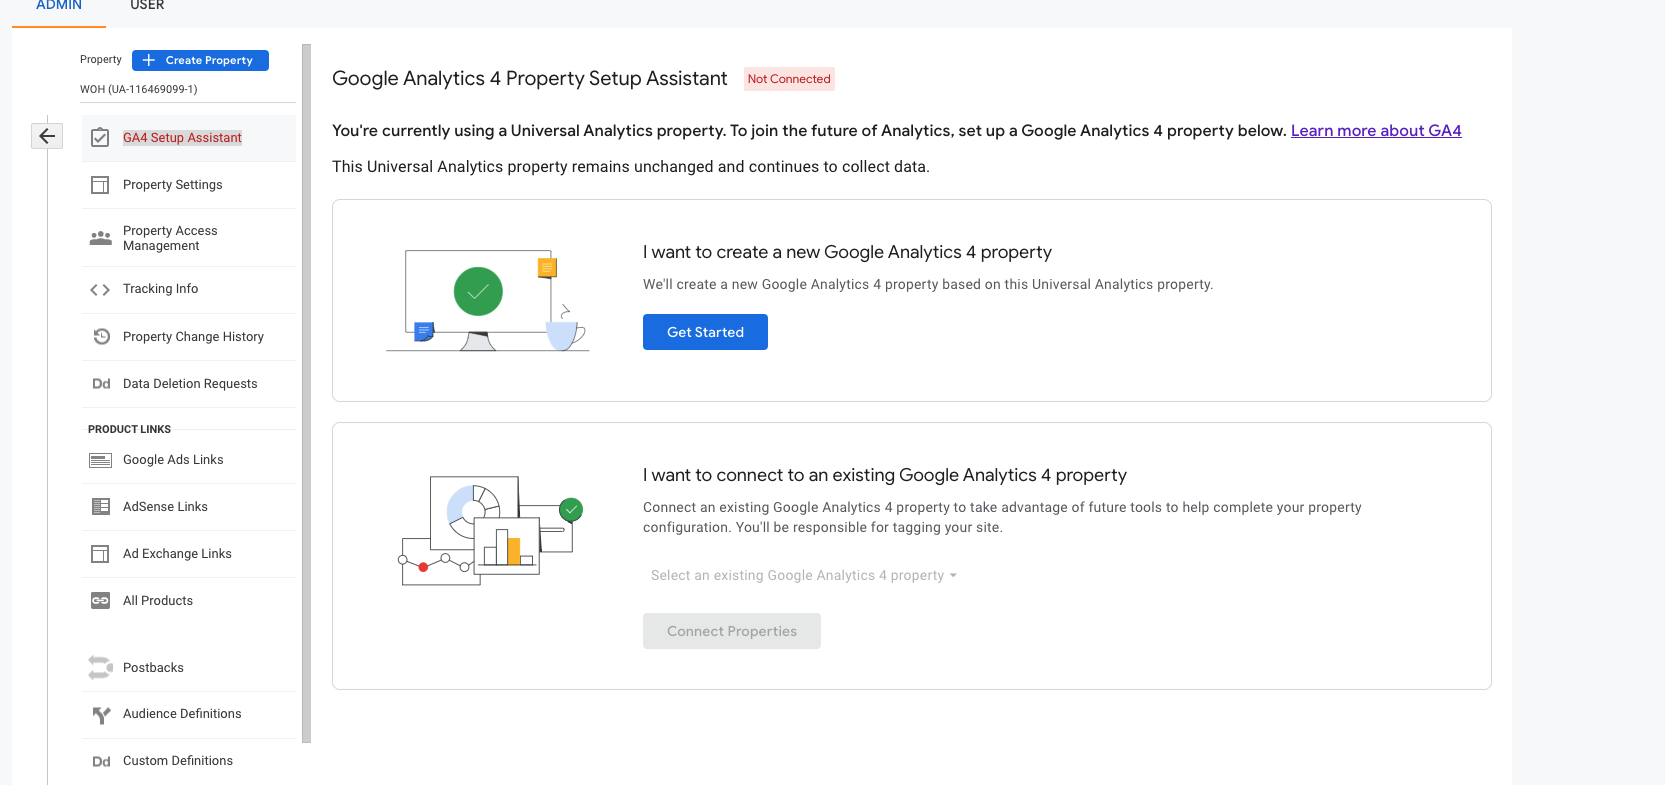
Easiest way to do this is go into Analytics > settings (in bottom left) and click GA4 setup assistant

this will:
– Create a GA4 property. This will keep your original Universal Analytics property unchanged.
– Copy basic settings from your UA property. You can then configure additional settings in your GA4 property as needed.
– Turn on enhanced measurement to measure interactions with your content. You must ensure that no personally identifiable information (PII) will be sent to Google.
Create your property then click go to your GA4 property
Step 2 – Connect GA4 to Shopify
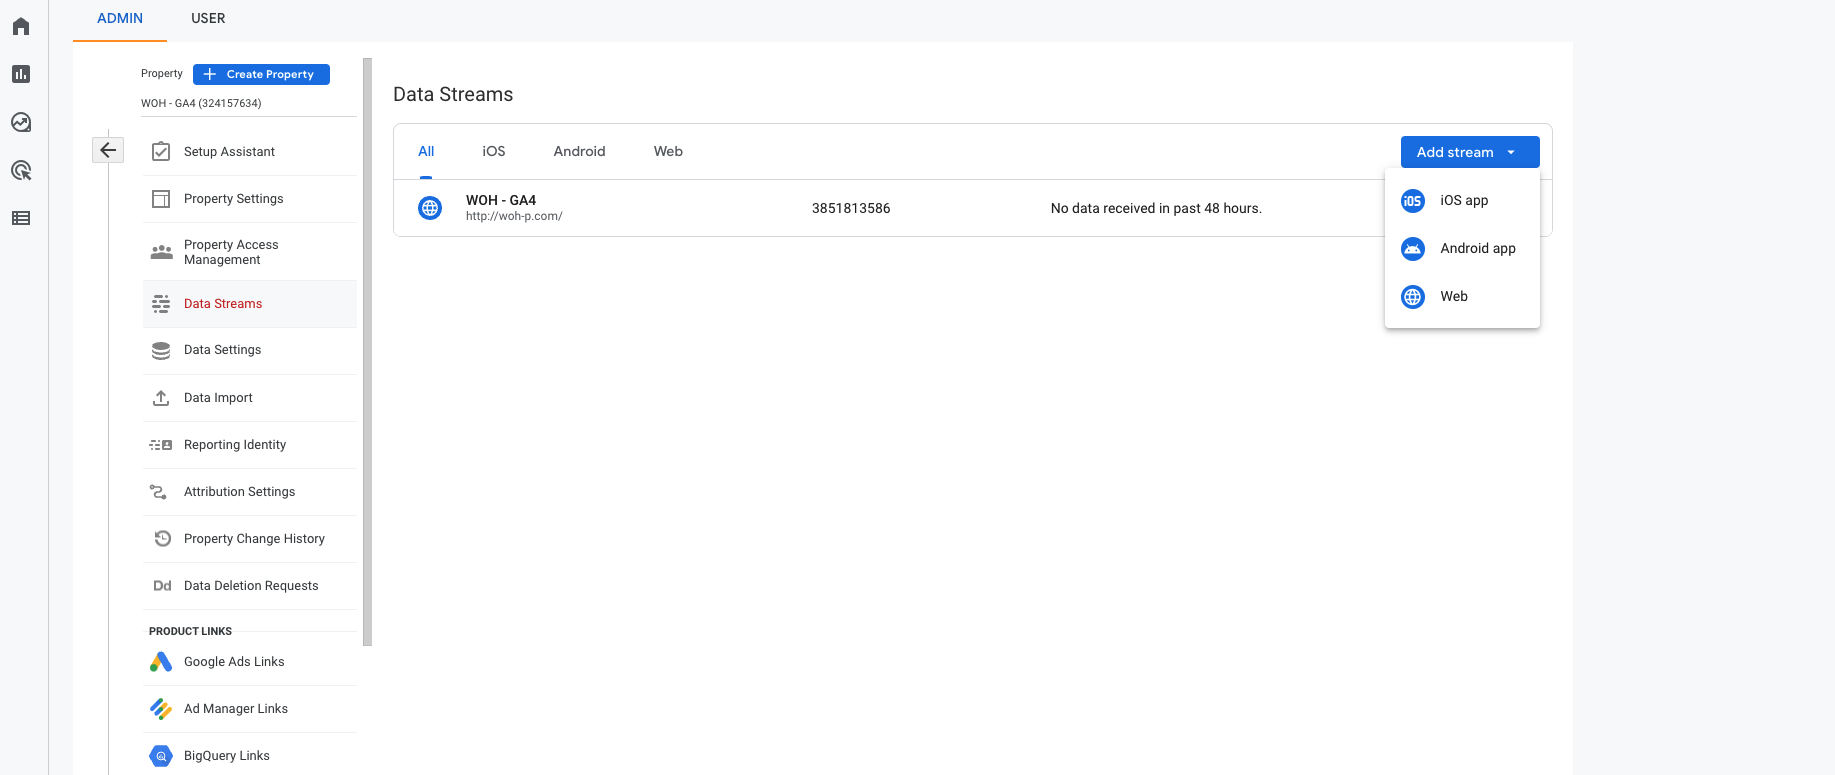
In your new GA4 property go to settings > Data streams > add data stream > add stream > web
If a stream doesn’t exist add one – if a stream exists click on the stream to edit it

Under tagging instructions select either Global site tag or Google tag manager. We prefer the Global site tag always but you can use tag manager if you want.
In our case we would copy and paste the given code to the head section of the website in the themes index.liquid file and in the additional scripts section of store checkout settings. If you’re using Shopify Plus you’ll also want to do this in the checkout.liquid file.
Step 3 – Ecommerce events
Doing the above will get your basic tracking working. But it will have no ecommerce data yet.
If you haven’t already done this then check your GA4 property settings for currency – by default it may be USD. Ensure it’s set to your base currency.
Ecommerce events are the next steps. Most people want to track at minimum:
1. Conversions
2. Item View
3. Item add/remove from bag
4. Refunds
5. Promotions
Some of these like Refunds and Promotions will likely have to wait until Shopify play catchup.
Until then you can implement desired ecommerce events. The following documentation from Google will need to be referenced by your Shopify developers. If you don’t work with a Shopify or Shopify Plus agency yet then now may be the time (we took care of all this in the background for most of our clients).
Below I’m giving the code for basic conversions which would be added to the additional scripts section of your Shopify admin ONLY if you’re using tag manager. This is just an example which would be applicable to many non-developers.
{% if first_time_accessed %}

  gtag('event', 'purchase', {

    'send_to':'G-xxxxxxxxxxx',

    "transaction_id": '{{ order.order_number }}',

    "affiliation": "Brand name",

    "value":'{{ total_price | money_without_currency | replace: ",",'.' }}',

    "currency": "{{shop.currency }}",

    "tax": '{{ tax_price  | money_without_currency | replace: ",",'.'}}',

    "shipping": '{{ shipping_method.price  | money_without_currency | replace: ",",'.'}}',

    "items": [

    {% for line_item in line_items %}

       {

       "item_id": '{{ line_item.product_id }}',

       "item_name": '{{ line_item.title }}',

       "list_name": "",

       "brand": "",

       "category": "",

       "item_variant": "{{ line_item.variant_id }}",

       "list_position":'' ,

       "quantity": '{{ line_item.quantity }}',

       "price": '{{ line_item.final_price | money_without_currency | replace: ",",'.' }}'

       }

  {% unless forloop.last %},{% endunless %} {% endfor %}

  ]
                                            });

{% endif %}
Note that you need to modify your affiliation and replace G-xxxxxxxxxxx with your property id.
You would also in this case need to ensure that your tag manager code is above this in the additional scripts section of Shopify.
Developers looking to implement code on the theme and conversion page should reference above docs and liquify it as required.
On most sites we have implemented:
– conversions
– product view
– add and remove from bag
– enter checkout
But you will likely have your own events which need defining.
Like I said doing this theme side as opposed to via tag manager is far more preferable. It will be faster and more reliable.
Tag manager is usually adding bloat.
Step 4 – Testing GA4 & Shopify
If implemented correctly your data should start to populate with events and revenue.
And events can also be tested in real time.
If you need help with your implementation it’s advised to contact us for a quote. Our Shopify developers have done this many times and will be able to code events into your theme so that they work flawlessly.
And remember to keep checking back in to see what Shopify do nativelty for GA4 as we imagine they will add in native events for discounts, refunds and more (you could do those now but will be more work/less relevant for some users).
Unfortunately providing code for all themes / situations is not viable in a blog post but we can code in whatever you need so long as you are on Shopify Plus. Just ask.


